Troubleshooting
- SSL connection errors
- Permission denied errors during installation
- Permission denied errors after using sudo conda command
- Already installed error message
- Conda reports that a package is installed, but it appears not to be
- pkg_resources.DistributionNotFound: conda==3.6.1-6-gb31b0d4-dirty
- macOS error “ValueError unknown locale: UTF-8”
- AttributeError or missing getproxies
- Shell commands open from the wrong location
- Programs fail due to invoking conda Python instead of system Python
- UnsatisfiableSpecifications error
- Package installation fails from a specific channel
- Conda automatically upgrades to unwanted version
- ValidationError: Invalid value for timestamp
- Unicode error after installing Python 2
SSL connection errors
Cause
Installing packages may produce a “connection failed” error if you do not have the certificates for a secure connection to the package repository.
Solution
Pip can use the --trusted-host option to indicate that the URL of the
repository is trusted:
pip install --trusted-host pypi.org
Conda has three similar options.
The option
--insecureor-kignores certificate validation errors for all hosts.Running
conda create --helpshows:Networking Options: -k, --insecure Allow conda to perform "insecure" SSL connections and transfers. Equivalent to setting 'ssl_verify' to 'false'.
The configuration option
ssl_verifycan be set toFalse.Running
conda config --describe ssl_verifyshows:# # ssl_verify (bool, str) # # aliases: verify_ssl # # Conda verifies SSL certificates for HTTPS requests, just like a web # # browser. By default, SSL verification is enabled, and conda operations # # will fail if a required url's certificate cannot be verified. Setting # # ssl_verify to False disables certification verification. The value for # # ssl_verify can also be (1) a path to a CA bundle file, or (2) a path # # to a directory containing certificates of trusted CA. # # # ssl_verify: true
Running
conda config --set ssl_verify falsemodifies~/.condarcand sets the-kflag for all future conda operations performed by that user. Runningconda config --helpshows other configuration scope options.When using
conda config, the user’s conda configuration file at~/.condarcis used by default. The flag--systemwill instead write to the system configuration file for all users at<CONDA_BASE_ENV>/.condarc. The flag--envwill instead write to the active conda environment’s configuration file at<PATH_TO_ACTIVE_CONDA_ENV>/.condarc. If--envis used and no environment is active, the user configuration file is used.The configuration option
ssl_verifycan be used to install new certificates.Running
conda config --describe ssl_verifyshows:# # ssl_verify (bool, str) # # aliases: verify_ssl # # Conda verifies SSL certificates for HTTPS requests, just like a web # # browser. By default, SSL verification is enabled, and conda operations # # will fail if a required url's certificate cannot be verified. Setting # # ssl_verify to False disables certification verification. The value for # # ssl_verify can also be (1) a path to a CA bundle file, or (2) a path # # to a directory containing certificates of trusted CA. # # # ssl_verify: true
Your network administrator can give you a certificate bundle for your network’s firewall. Then
ssl_verifycan be set to the path of that certificate authority (CA) bundle, and package installation operations will complete without connection errors.When using
conda config, the user’s conda configuration file at~/.condarcis used by default. The flag--systemwill instead write to the system configuration file for all users at<CONDA_BASE_ENV>/.condarc. The flag--envwill instead write to the active conda environment’s configuration file at<PATH_TO_ACTIVE_CONDA_ENV>/.condarc. If--envis used and no environment is active, the user configuration file is used.
Permission denied errors during installation
Cause
The umask command determines the mask settings that control
how file permissions are set for newly created files. If you
have a very restrictive umask, such as 077, you get
“permission denied” errors.
Solution
Set a less restrictive umask before calling conda commands.
Conda was intended as a user space tool, but often users need to
use it in a global environment. One place this can go awry is
with restrictive file permissions. Conda creates links when you
install files that have to be read by others on the system.
To give yourself full permissions for files and directories, but prevent the group and other users from having access:
Before installing, set the
umaskto007.Install conda.
Return the
umaskto the original setting:umask 007 conda install umask 077
For more information on umask, see
http://en.wikipedia.org/wiki/Umask.
Permission denied errors after using sudo conda command
Solution
Once you run conda with sudo, you must use sudo forever. We recommend that you NEVER run conda with sudo.
Already installed error message
Cause
If you are trying to fix conda problems without removing the current installation and you try to reinstall Miniconda or Anaconda to fix it, you get an error message that Miniconda or Anaconda is already installed, and you cannot continue.
Solution
Install using the –force option.
Download and install the appropriate Miniconda
for your operating system from the Miniconda download page using the force option
--force or -f:
bash Miniconda3-latest-MacOSX-x86_64.sh -f
NOTE: Substitute the appropriate filename and version for your operating system.
NOTE: Be sure that you install to the same install location as your existing install so it overwrites the core conda files and does not install a duplicate in a new folder.
Conda reports that a package is installed, but it appears not to be
Sometimes conda claims that a package is already installed, but it does not appear to be, for example, a Python package that gives ImportError.
There are several possible causes for this problem, each with its own solution.
Cause
You are not in the same conda environment as your package.
Solution
Make sure that you are in the same conda environment as your package. The
conda infocommand tells you what environment is currently active—underdefault environment.Verify that you are using the Python from the correct environment by running:
import sys
print(sys.prefix)
Cause
For Python packages, you have set the PYTHONPATH or PYTHONHOME variable. These environment variables cause Python to load files from locations other than the standard ones. Conda works best when these environment variables are not set, as their typical use cases are obviated by conda environments and a common issue is that they cause Python to pick up the wrong versions or broken versions of a library.
Solution
For Python packages, make sure you have not set the PYTHONPATH
or PYTHONHOME variables. The command conda info -a displays
the values of these environment variables.
- To unset these environment variables temporarily for the
current Terminal session, run
unset PYTHONPATH. - To unset them permanently, check for lines in the files:
- If you use bash—
~/.bashrc,~/.bash_profile,~/.profile. - If you use zsh—~/.zshrc`.
- If you use PowerShell on Windows, the file output by
$PROFILE.
- If you use bash—
Cause
You have site-specific directories or, for Python, you have
so-called site-specific files. These are typically located in
~/.local on Linux and macOS. For a full description of the locations of
site-specific packages, see PEP 370. As with
PYTHONPATH, Python may try importing packages from this
directory, which can cause issues.
Solution
For Python packages, remove site-specific directories and site-specific files.
Cause
For C libraries, the following environment variables have been set:
- macOS—DYLD_LIBRARY_PATH.
- Linux—LD_LIBRARY_PATH.
These act similarly to PYTHONPATH for Python. If they are
set, they can cause libraries to be loaded from locations other
than the conda environment. Conda environments obviate most use
cases for these variables. The command conda info -a shows
what these are set to.
Solution
Unset DYLD_LIBRARY_PATH or LD_LIBRARY_PATH.
Cause
Occasionally, an installed package becomes corrupted. Conda works
by unpacking the packages in the pkgs directory and then
hard-linking them to the environment. Sometimes these get
corrupted, breaking all environments that use them, and also any
additional environments, since the same files are hard-linked
each time.
Solution
Run the command conda install -f to unarchive the package
again and relink it. It also does an md5 verification on the
package. Usually if this is different, it is because your
channels have changed and there is a different package with the
same name, version, and build number.
NOTE: This breaks the links to any other environments that
already had this package installed, so you have to reinstall it
there, too. It also means that running conda install -f a lot
can use up a lot of disk space if you have a lot of environments.
NOTE: The -f flag to conda install (--force) implies
--no-deps, so conda install -f package does not reinstall
any of the dependencies of package.
pkg_resources.DistributionNotFound: conda==3.6.1-6-gb31b0d4-dirty
Cause
The local version of conda needs updating.
Solution
Force reinstall conda. A useful way to work off the development
version of conda is to run python setup.py develop on a
checkout of the conda git repository. However, if you are not
regularly running git pull, it is a good idea to un-develop,
as you will otherwise not get any regular updates to conda. The
normal way to do this is to run python setup.py develop -u.
However, this command does not replace the conda script
itself. With other packages, this is not an issue, as you can
just reinstall them with conda, but conda cannot be used if
conda is installed.
The fix is to use the ./bin/conda executable in the conda
git repository to force reinstall conda, that is, run
./bin/conda install -f conda. You can then verify with
conda info that you have the latest version of conda, and not
a git checkout—the version should not include any hashes.
macOS error “ValueError unknown locale: UTF-8”
Cause
This is a bug in the macOS Terminal app that shows up only in certain locales. Locales are country-language combinations.
Solution
Open Terminal in
/Applications/UtilitiesClear the Set locale environment variables on startup checkbox.
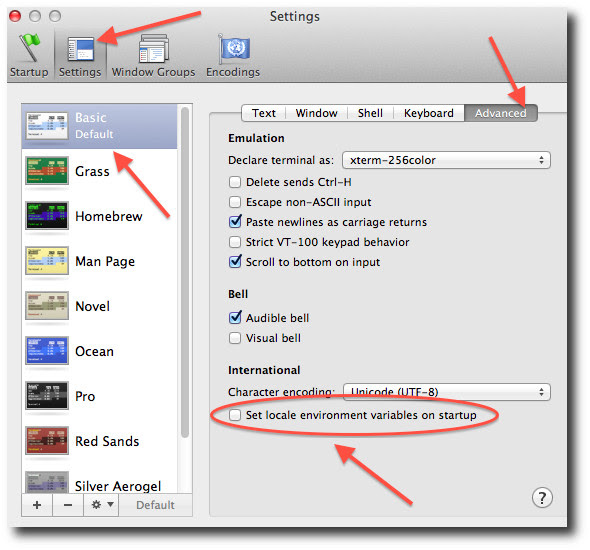
This sets your LANG environment variable to be empty. This may
cause Terminal use to incorrect settings for your locale. The
locale command in Terminal tells you what settings are used.
To use the correct language, add a line to your bash profile,
which is typically ~/.profile:
export LANG=your-lang
NOTE: Replace your-lang with the correct locale specifier for
your language.
The command locale -a displays all the specifiers. For
example, the language code for US English is en_US.UTF-8. The
locale affects what translations are used when they are available
and also how dates, currencies and decimals are formatted.
AttributeError or missing getproxies
When running a command such as conda update ipython, you may
get an AttributeError: 'module' object has no attribute
'getproxies'.
Cause
This can be caused by an old version of requests or by having
the PYTHONPATH environment variable set.
Solution
Update requests and be sure PYTHONPATH is not set:
- Run
conda info -ato show therequestsversion and various environment variables such asPYTHONPATH. - Update the
requestsversion withpip install -U requests. - Clear
PYTHONPATH:- On Windows, clear it the environment variable settings.
- On macOS and Linux, clear it by removing it from the bash profile and restarting the shell.
Shell commands open from the wrong location
When you run a command within a conda environment, conda does not access the correct package executable.
Cause
In both bash and zsh, when you enter a command, the shell searches the paths in PATH one by one until it finds the command. The shell then caches the location, which is called hashing in shell terminology. When you run command again, the shell does not have to search the PATH again.
The problem is that before you installed the program, you ran a command which
loaded and hashed another version of that program in some other location on
the PATH, such as /usr/bin. Then you installed the program
using conda install, but the shell still had the old instance
hashed.
Solution
Reactivate the environment or run hash -r (in bash) or
rehash (in zsh).
When you run source activate, conda automatically runs
hash -r in bash and rehash in zsh to clear the hashed
commands, so conda finds things in the new path on the PATH. But
there is no way to do this when conda install is run because
the command must be run inside the shell itself, meaning either
you have to run the command yourself or use source a file that
contains the command.
This is a relatively rare problem, since this happens only in the following circumstances:
- You activate an environment or use the root environment, and then run a command from somewhere else.
- Then you conda install a program, and then try to run the
program again without running
activateordeactivate.
The command type command_name always tells you exactly what
is being run. This is better than which command_name, which
ignores hashed commands and searches the PATH directly.
The hash is reset by source activate, or by hash -r in bash or
rehash in zsh.
Programs fail due to invoking conda Python instead of system Python
Cause
After installing Anaconda or Miniconda, programs that run
python switch from invoking the system Python to invoking the
Python in the root conda environment. If these programs rely on
the system Python to have certain configurations or dependencies
that are not in the root conda environment Python, the programs
may crash. For example, some users of the Cinnamon desktop
environment on Linux Mint have reported these crashes.
Solution
Edit your .bash_profile and .bashrc files so that the
conda binary directory, such as ~/miniconda3/bin, is no
longer added to the PATH environment variable. You can still run
conda activate and deactivate by using their full
path names, such as ~/miniconda3/bin/conda.
You may also create a folder with symbolic links to conda,
activate and deactivate, and then edit your
.bash_profile or .bashrc file to add this folder to your
PATH. If you do this, running python will invoke the system
Python, but running conda commands, source activate MyEnv,
source activate root, or source deactivate will work
normally.
After running source activate to activate any environment,
including after running source activate root, running
python will invoke the Python in the active conda environment.
UnsatisfiableSpecifications error
Cause
Some conda package installation specifications are impossible to
satisfy. For example, conda create -n tmp python=3 wxpython=3
produces an “Unsatisfiable Specifications” error because wxPython
3 depends on Python 2.7, so the specification to install Python 3
conflicts with the specification to install wxPython 3.
When an unsatisfiable request is made to conda, conda shows a message such as this one:
The following specifications were found to be in conflict:
- python 3*
- wxpython 3* -> python 2.7*
Use "conda info <package>" to see the dependencies for each package.
This indicates that the specification to install wxpython 3 depends on installing Python 2.7, which conflicts with the specification to install python 3.
Solution
Use “conda info wxpython” or “conda info wxpython=3” to show information about this package and its dependencies:
wxpython 3.0 py27_0
-------------------
file name   : wxpython-3.0-py27_0.tar.bz2
name        : wxpython
version     : 3.0
build number: 0
build string: py27_0
channel     : defaults
size        : 34.1 MB
date        : 2014-01-10
fn          : wxpython-3.0-py27_0.tar.bz2
license_family: Other
md5         : adc6285edfd29a28224c410a39d4bdad
priority    : 2
schannel    : defaults
url         : https://repo.continuum.io/pkgs/free/osx-64/wxpython-3.0-py27_0.tar.bz2
dependencies:
    python 2.7*
    python.app
By examining the dependencies of each package, you should be able to determine why the installation request produced a conflict and modify the request so it can be satisfied without conflicts. In this example, you could install wxPython with Python 2.7:
conda create -n tmp python=2.7 wxpython=3
Package installation fails from a specific channel
Cause
Sometimes it is necessary to install a specific version from a specific channel because that version is not available from the default channel.
Solution
The following example describes the problem in detail and its solution.
Suppose you have a specific need to install the Python
cx_freeze module with Python 3.4. A first step is to create a
Python 3.4 environment:
conda create -n py34 python=3.4
Using this environment you should first attempt:
conda install -n py34 cx_freeze
However, when you do this you get the following error:
Using Anaconda Cloud api site https://api.anaconda.org
Fetching package metadata .........
Solving package specifications: .
Error: Package missing in current osx-64 channels:
- cx_freeze

You can search for packages on anaconda.org with

  anaconda search -t conda cx_freeze
The message indicates that cx_freeze cannot be found in the
default package channels. However, there may be a
community-created version available and you can search for it by
running the following command:
$ anaconda search -t conda cx_freeze
Using Anaconda Cloud api site https://api.anaconda.org
Run 'anaconda show <USER/PACKAGE>' to get more details:
Packages:
     Name                      |  Version | Package Types   | Platforms
     ------------------------- |   ------ | --------------- | ---------------
     inso/cx_freeze            |    4.3.3 | conda           | linux-64
     pyzo/cx_freeze            |    4.3.3 | conda           | linux-64, win-32, win-64, linux-32, osx-64
                                          : http://cx-freeze.sourceforge.net/
     silg2/cx_freeze           |    4.3.4 | conda           | linux-64
                                          : create standalone executables from Python scripts
     takluyver/cx_freeze       |    4.3.3 | conda           | linux-64
Found 4 packages
In this example, there are 4 different places that you could try to get the package. None of them are officially supported or endorsed by Anaconda, but members of the conda community have provided many valuable packages. If you want to go with public opinion, then the web interface provides more information:
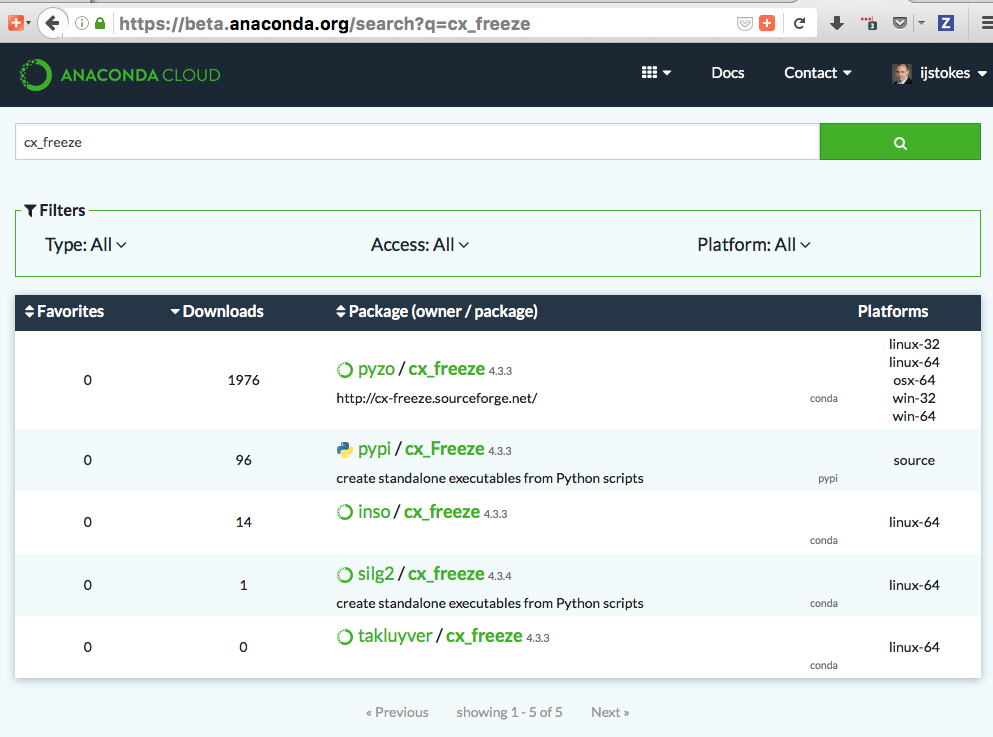
Notice that the pyzo organization has by far the most
downloads, so you might choose to use their package. If so, you
can add their organization’s channel by specifying it on the
command line:
$ conda create -c pyzo -n cxfreeze_py34 cx_freeze python=3.4
Using Anaconda Cloud api site https://api.anaconda.org
Fetching package metadata: ..........
Solving package specifications: .........

Package plan for installation in environment /Users/ijstokes/anaconda/envs/cxfreeze_py34:

The following packages will be downloaded:

    package                    |            build
    ---------------------------|-----------------
    cx_freeze-4.3.3            |           py34_4         1.8 MB
    setuptools-20.7.0          |           py34_0         459 KB
    ------------------------------------------------------------
                                           Total:         2.3 MB

The following NEW packages will be INSTALLED:

    cx_freeze:  4.3.3-py34_4
    openssl:    1.0.2h-0
    pip:        8.1.1-py34_1
    python:     3.4.4-0
    readline:   6.2-2
    setuptools: 20.7.0-py34_0
    sqlite:     3.9.2-0
    tk:         8.5.18-0
    wheel:      0.29.0-py34_0
    xz:         5.0.5-1
    zlib:       1.2.8-0
Now you have a software environment sandbox created with Python
3.4 and cx_freeze.
Conda automatically upgrades to unwanted version
When making a python package for an app, you create an
environment for the app from a file req.txt that sets a
certain version, such as python=2.7.9. However, when you
conda install your package, it automatically upgrades to a
later version, such as 2.7.10.
Cause
If you make a conda package for the app using conda build, you
can set dependencies with specific version numbers. The
requirements lines that say - python could be
- python ==2.7.9 instead. It is important to have 1 space
before the == operator and no space after.
Solution
Exercise caution when coding version requirements.
ValidationError: Invalid value for timestamp
Cause
This happens when certain packages are installed with conda 4.3.28, and then conda is downgraded to 4.3.27 or earlier.
Solution
Unicode error after installing Python 2
Example: UnicodeDecodeError: ‘ascii’ codec can’t decode byte 0xd3 in position 1: ordinal not in range(128)
Cause
Python 2 is incapable of handling unicode properly, especially on Windows. In this case, if any character in your PATH env. var contains anything that is not ASCII then you see this exception.
Solution
Remove all non-ASCII from PATH or switch to Python 3.